
As I’m getting older I look back on all the things I’ve done as a creative developer, and I see so many cool projects! But I never wrote down any development stories, and most of these projects, even as successful when released, got lost in time as years go by. That’s why I’m starting my new posts series „That time I” where I look back on my most interesting projects.
The first one is about that time I recreated Photoshop in C++ and Windows API! I invite you to read my story and leave a comment with feedback, it’s hard to go on without your input 🙂
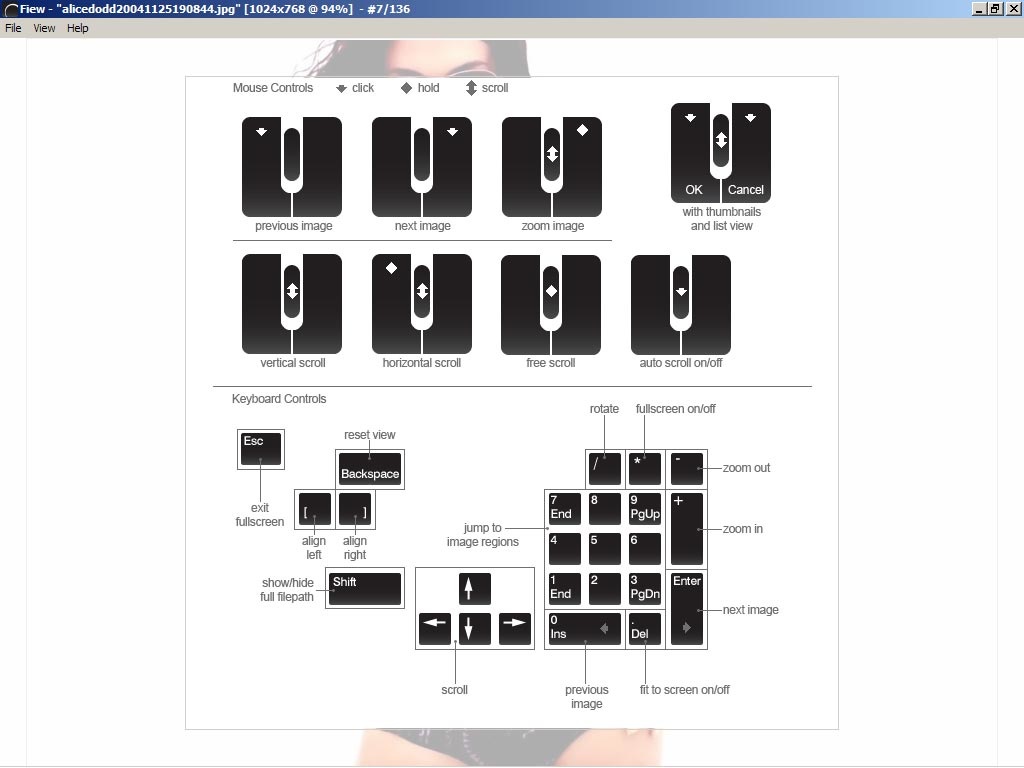
Everything started in early summer of 2006. I was reading *a lot* of manga back then. But all the image reading apps sucked. Specifically, none of the apps allowed me to control my reading using just the mouse, and reaching my keyboard all the time was distracting. Since I just finished the C++/Windows API course at the uni, I spent the summer break coding my perfect manga reader. And I named it Fiew.
Early autumn 2006 we returned to uni and had to decide on our final thesis for the degree. Writing the image viewer went smooth enough that I got the idea I could create an image editor as well. I was a heavy Adobe Photoshop user back then, so that became my goal. I mean, how hard can it be? Turns out, very.
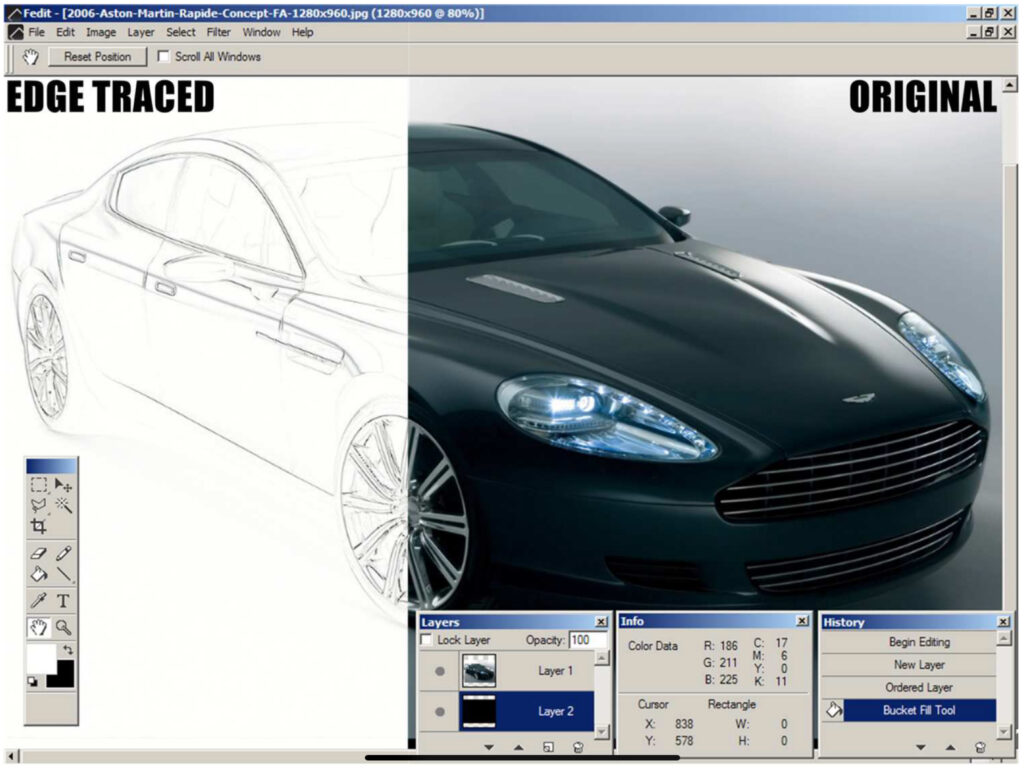
Over the course of the next several months, I wrote Advanced Image Editor named Fedit in C++ using Windows API and GDI+ graphic libraries. It followed a set of five rules to benefit the end user: no installers, no archives, no registry keys, no additional runtimes and a single executable file. The result was a program that was ready to work without the need of installation, could be run on systems with limited privileges (or straight from a thumb drive) and consumed small amounts of resources.
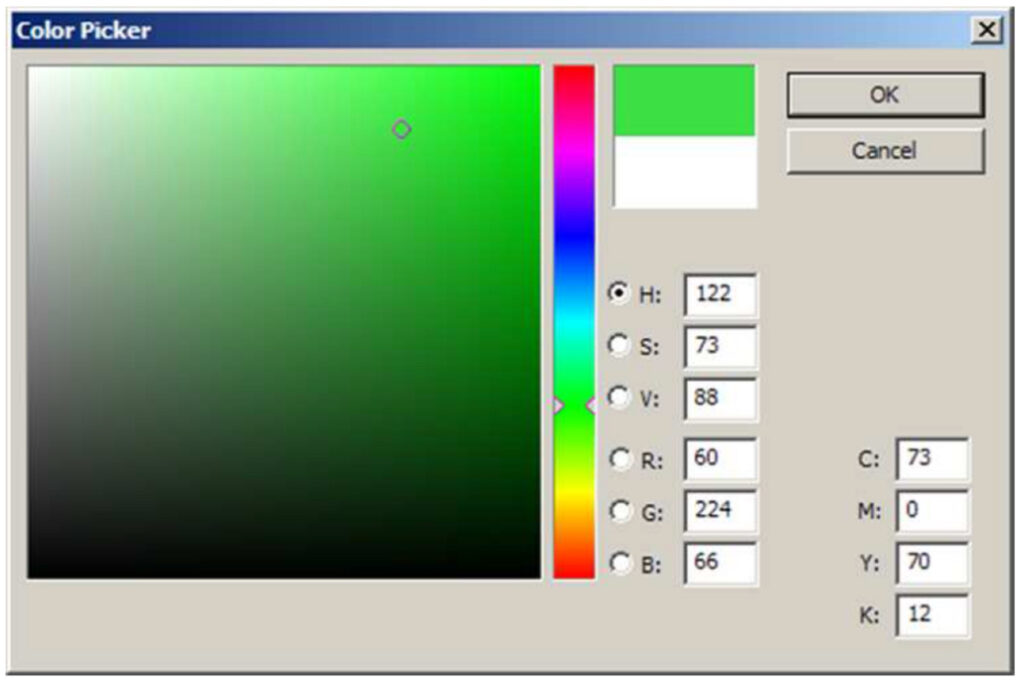
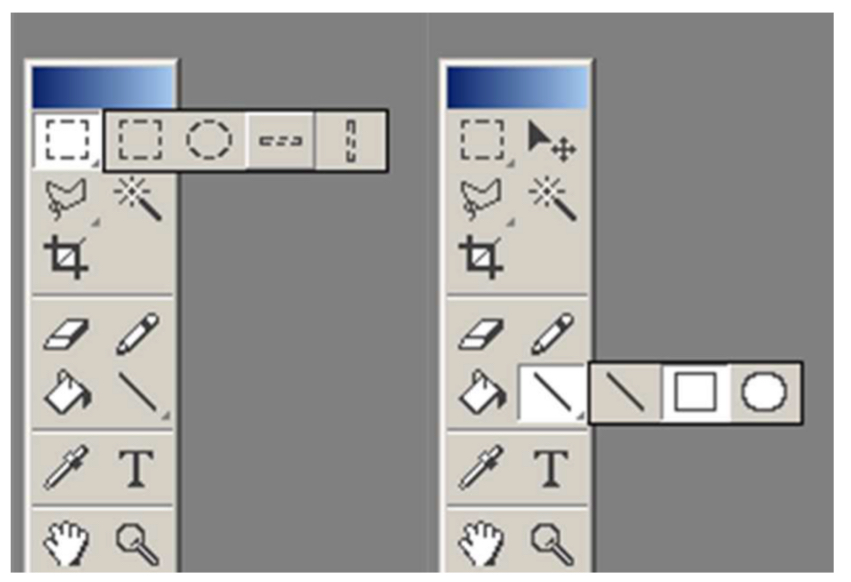
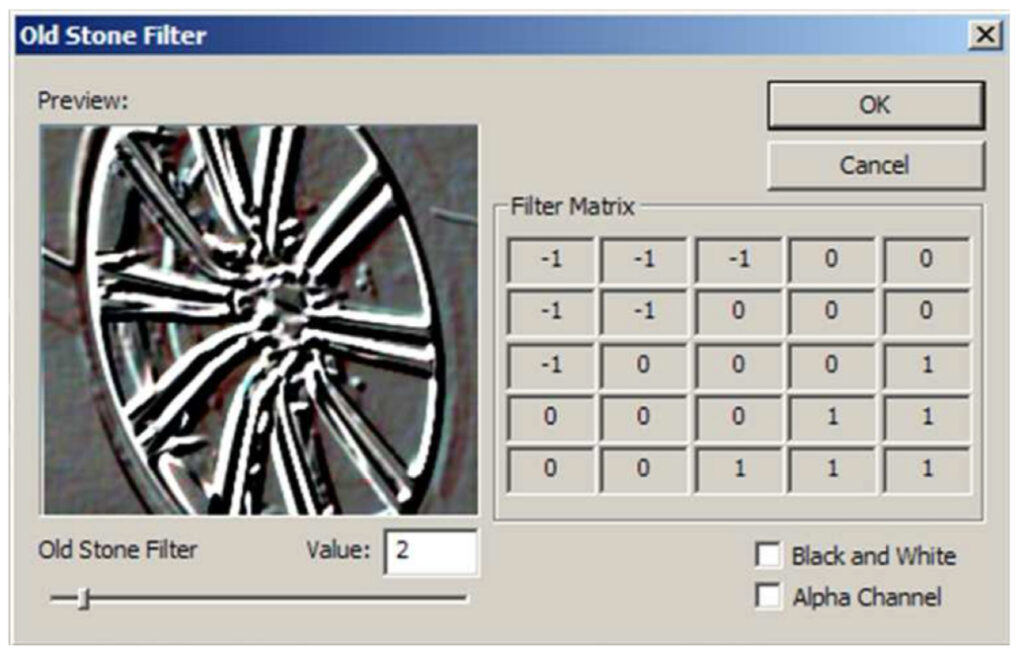
I was very careful to make the interface look like classic Photoshop, and include all my most used features. So you had all the free floating windows with tools. The excellent colour picker. Easy layer management. Step-by-step reversible history. Several image filters, plus a matrix interface to encode your own pixel shifting filters too.
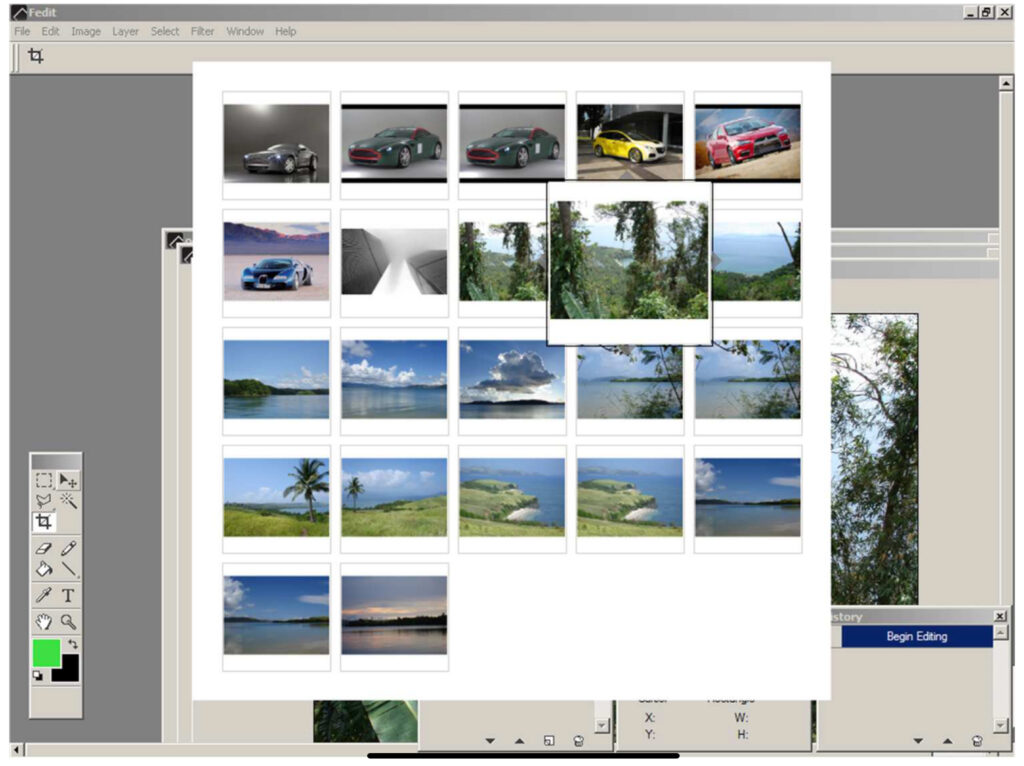
Straight from my previous project named Fiew I added a massive image library viewer. It really could quickly and easily scroll through massive amounts of pictures.
I had a lot of fun coding Fedit. And a lot of issues along the way. I spent a ton of time on MSDN and Experts Exchange (old web Stack Overflow), however that didn’t help that much since most of the issues were so specific I had to analyse and debug them on my own. But I worked like crazy on it, my motivation was immense. I had to make the bachelor thesis deadline, so for the final two-month stint I worked 14 hours a day.
User interface was the most tricky bit. I wanted the workflow to resemble Photoshop as much as possible. The freely snapping-unsnapping of the tool settings pane was particularly hard. But no less than recreating the colour picker or the tool selector.

By the time I finished I was pretty exhausted and kind of resenting WinAPI. But the thesis was a success and I received my Bachelor of Science in Engineering from the Warsaw University of Technology. Fedit received several positive reviews online but I didn’t promote it. Instead I took a well deserved holiday. A few months later thanks to the impression Fiew and Fedit made on the CTO of GoldenLine (Polish LinkedIn, market leader in its time, but now defunct), I landed a C++ job with a task to create extremely efficient WinAPI app to handle massive image uploading for a clone of Flickr. So in the end all that effort paid off.
Fedit (and Fiew) source code is available on GitHub. The thesis documentation is available as PDF. The original website for these apps is still up on the Web Archive! You can join a variety discussion on Hacker News.
12 replies on “That time I recreated Photoshop in C++”
Amazing post. I need this type of motivation. How can one be so much motivated for such long period of time.
Also, with the wave of AI and very less jobs, what is your advice to someone who wants to break into tech and or get a job at a big tech. A roadmap, step by step process or something?
Thanks! Fun is the best motivation. You need to have fun building, watching it appear and work as expected. It’s like building with legos. At first there is nothing much, then with every step you see more of it, and at the end it’s amazing. And you have fun in the process.
It’s hard to say how to break into IT these days, with AI etc. We are witnessing a great shift. It’s a challenge for the old way of thinking about IT jobs, but also an opportunity if you don’t follow the usual path. You need to adapt quickly, and take leaps of faith. Best bet probably is to become an expert in managing AIs.
Also want to mention one thing, the hardest part for me was doing the “brush”. Because I wasn’t doing “stamp”ing like photoshop, I think photoshop doing some “stamp”ing in order to create different brushes. I used lines, so when mouse moves it was just creating short lines if that does make any sense. and it was soooo slow. Like whenever mouse moves it was just look at image and just changes it, but this is not good. So I was using 700×9000 webtoon to see how things working and it was around 150~ fps. Most people would say that’s fine, but it wasn’t imo. I knew that I could do much faster. So I thought just changing the parts where mouse is around, can’t explain too well but I somehow think you would understand me 😀 So after trying lots of things, like photoshop “spacing” (tho I don’t like spacing thing in photoshop, the first thing I do is changing that from 25% to 4% whenever I install this program). In the end I could manage to get 1k~ish fps. https://imgur.com/a/nPjki1C This is the image. Just wanted to share this, because I don’t see anyone else doing photoshop clone other than me and you 😀 I’m hella impressed by the things u did in 2006 wow, thank you for sharing this. It made me so happy to see, had to write a comment again 😀
That was one of my bigger challenges as well! In fact there is a small rendering bug when painting in my app, if I remember correctly. However, there is a whole section in my thesis about optimising for real time painting performance. I think I am re-rendering only the square area the size of the currently selected brush. Additionally I remember WinAPI mouse position polling was sometimes sparse when the cursor was moving fast so I think there was some approximation involved to smooth the drawing line. I never thought about it in terms of FPS, very interesting!
Sorry for posting same thing for twice, I thought it didn’t “post”. Yeah I read your thesis, it’s awesome seems much better than mine 😀
And downloaded program, seems too much out-dated, so many things to improve on… but yeah I can only imagine the hard work for that time. And yeah there is a kinda rendering bug when painting, u remember correctly 🙂
This is awesome, you’re a brave one. After spending some time with the WASAPI last weekend I wouldn’t wish the hell that is interface upon anyone.
FYI your comment box submit button is out of view on Firefox.
I was fascinated by C++ back then, and the powers WinAPI gave a developer. It was so bare bone and direct to Windows. I thought I could do anything. It was basically true, but very very hard work.
Thanks for the note on the comment box, I just fixed it by turning off Jetpack enhancements.
Yoooo! THAT’S TOO COOL! I’m a student from Turkey and I did Photoshop in PyQt for my bachelor’s degree this year!! Daamn, and it has specific functionalities for manga editing! The reason I tried this also because was manga. It’s crazy to see a person who is doing the similiar stuff in 20 years ago.
Btw can’t comment because of “This site uses Akismet to reduce spam. Learn how your comment data is processed.” thing. Or maybe because of “scroll” thing not appearing.
Btw for me, the hardest part was like the brush thing. And I actually didn’t implement brushes as ps does. Since I have to show the brush on every mouse move, it’s kinda too much consuming. So I had to think a lot on this one, I did something like a “polling” system, kinda like the photoshop “spacing”. When I first wrote my code, it had almost 150~ fps on 700×9000 image. It was doing lines not stamping if the words makes sense. My biggest mistake was refreshing the image whenever the mouse moves so it was okay in 1920×1080 images. And 150~fps doesn’t sound too bad actually. But you know, I knew that I could do better, so I wanted to make it much faster. And I DID actually. This image https://imgur.com/a/nPjki1C shows the difference. It was hard to do, but after I accomplish this it was soo good to see. It makes you so happy, I think you know what I mean 😀
Hello from Poland! That’s indeed so cool and coincidental 🙂 PyQt sounds nice, I need to get into Python more. I fixed the comment box too, should be easier to submit now.
What is manga?
Mange is japanese cartoons